Image Map
Showing posts with label Silhouette. Show all posts

Geek Lab: Fun under the sun!


Hi everyone! A great day to all of you! Here's my project for Clique Kits playing with the August kit which is just so full of summer love that I can’t help scrapping a photo of a day out with my friends.
I made a spinning photo wheel just simply by attaching a brad to the centre of the photo and it does creates more interest to my project. The clouds and sun were created using my Silhouette Cameo! IKR, how can summer not have sun and clouds?:P Here’s some simple tips on how to create your very own clouds with Silhouette Cameo!
1. Open up the cameo software and start with an empty page.

2. Draw circles around as shown with the eclipse tool.

3. Then select all of the circles.
4. Then select the weld tool. Ta-da a cloud like pattern is formed. 
5. To have a flat base like in my layout, use the rectangular tool and make sure the rectangular covers the bottom of the cloud completely.
6. Then select object, modify and subtract.
7. Here’s how it looks like! Of course to get a nice clouds you need to attempt a few more times till you like it!

8. Lastly, I cut it on a white smooth card stock and watercolored it. All the products were from the August Kit:

Hope you have already gotten yours and till my next update, take care and God Bless!:D
 photo simply-sig_zpscc0a663a.jpg
 photo fb_zpsdef78796.jpg    photo insta_zps15a36000.jpg    photo pinterest_zpsa4f864e4.jpg    photo mail_zps2667dbe9.jpg

Japan Aerospace Exploration Agency

Hello everyone! I am back today to share a layout I did using the June Kit filled with Crate Paper products! This background of my layout was made using one of the cut files on Silhouette Cameo. Have you ever had the problem of your cameo not cutting properly or not too sure which settings to go for?  

After many trials and errors, I figured out to get a perfect cut, you need to first have a smooth cardstock to reduce any possible resistance from the surface. I like to choose 250gsm smooth cardstock so that it won't be too flimsy as an embellishment. Then, I like to choose blade 5 (but that would depend entirely on how frequent you use the Cameo) for a nice cut. Hope these few tips helped! Please also share with me some of your other Cameo tips!


So happy I had the opportunity to tour around Japan's equivalent of NASA training facilities!:D Learnt a lot as well!
 photo IMG_4337_zpsmwnuzgcy.jpg

As there were simply too many photos to scrap with, I made an album to keep the extra photos!
 photo IMG_4341_zpsxomdoyes.jpg

And I added magnetic tape for my album cover and it closes tightly together! Awesome!
 photo IMG_4342_zps7pw3kjql.jpg

 photo IMG_4344_zpswa7uvrmp.jpg
I added arrow tabs from the Crate Paper collection so I can pull out the tabs easily and added journaling at the back side of the photos!
 photo IMG_4345_zpstlqbmiui.jpg
Thanks so much for dropping by! Till my next update, take care and God Bless!:D


This is where our Love Story begins....

Hello good day to all!:D Have you been following the scrapbook trends lately? Any particular ones you feel inspired to create?

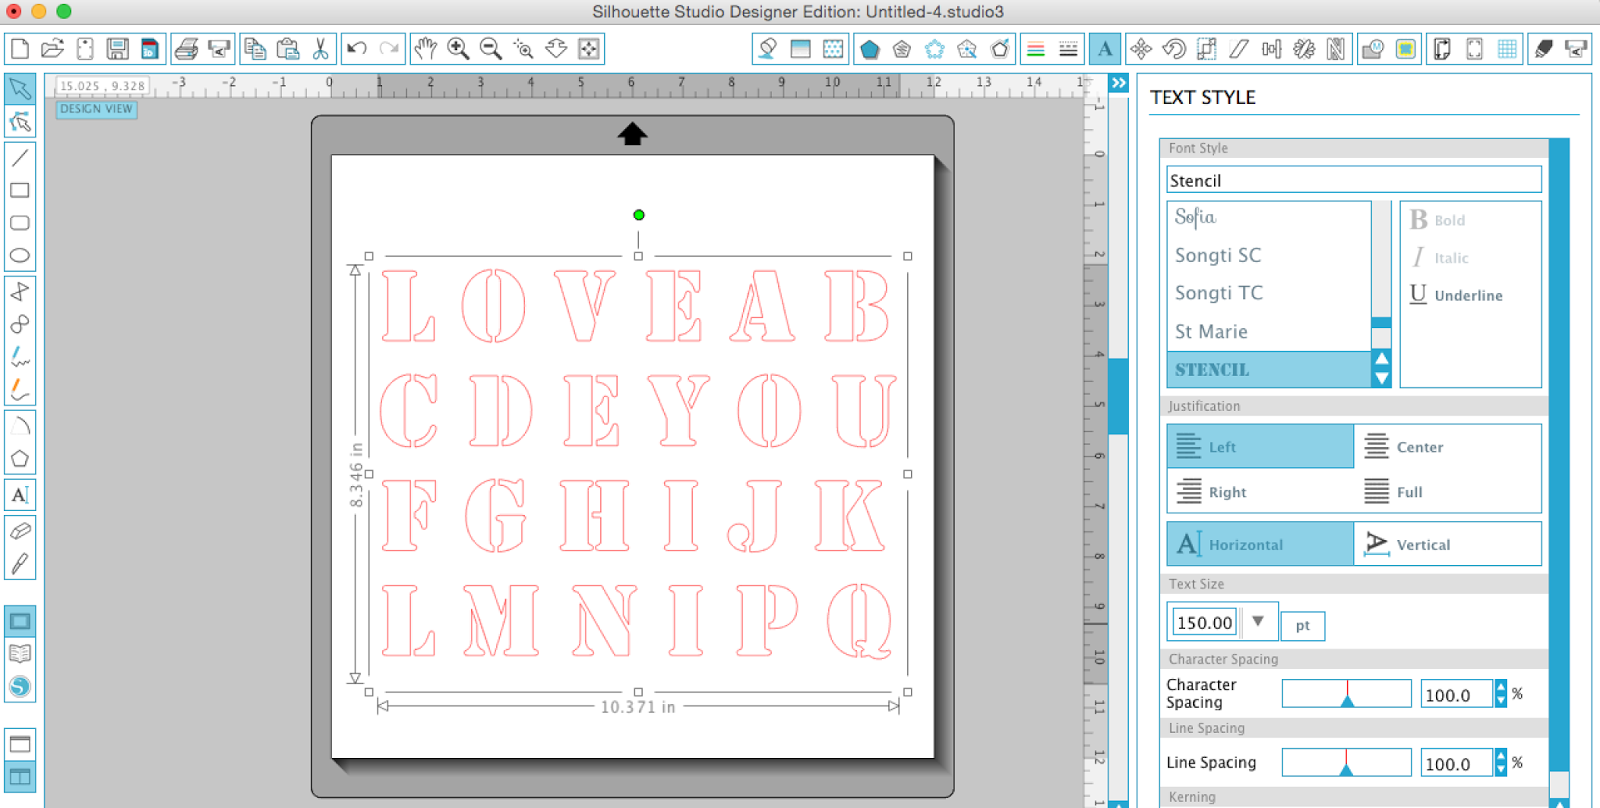
For this layout, I created with the text as the background and this was created with my Silhouette Cameo!

 photo IMG_4064_zpswzpxtmvy.jpg 

 photo IMG_4061_zpsgdosa957.jpg

1. Open the program on your Cameo (great if you have the Designer Edition).
2. Download the Stencil font.
3. Type in words accordingly as attached and have it cut:


4. Find random patterned papers and attached them to the back of the layout.
5. Decorate accordingly!

 photo IMG_4060_zps03y9fgop.jpg

Supplies:Date Night Patterned papers- Backwoods Lovin (DN14OS10), Cutest Couple (DN14OS05), Awesome Blossom (DN14OS01), Dance Party (DN14OS11), Plaid is Rad (DN14OS12), Date Night Illustration Stickers (DN14EB02), Date Night Mini Sticker Tags (DN14EB04), Scrumptious – Frolic In The Leaves (sc14os11) 

Come join us and share your creations on our Facebook Page or tag us on Instagram! Thanks so much for dropping by and sending some love! Hope you liked it! Till my next update, take care and God Bless!:D
 photo simply-sig_zpscc0a663a.jpg
 photo fb_zpsdef78796.jpg    photo insta_zps15a36000.jpg    photo pinterest_zpsa4f864e4.jpg    photo mail_zps2667dbe9.jpg

2014 Year in Review!:D

Heyyie all!! Cassandra here and I am so excited to share my 2014 year in review layout! I created this huge layout by combining 4 8x8" layout together! 


So many things to be thankful and grateful for - a stable relationship, strong family support, close cousins and friends, a fulfilling career as a nurse and being adventurous and trying so many new things! I hope that my 2015 will continue to be like this!
 photo IMG_3819_zps80500f8a.jpgHere's how I created it:
1. First, I used my Silhouette Cameo to measure a 7.5x7.5" square, then I used the Pacifico font to type the 2014 numbers then got them cut!
2. Then I chose 4 patterned papers as the base and cut them to 8x8".
3. I printed my photos and started layering them.
4. The wordings were printed on vellum so that the contrast against the white background will not be that great!
5. And I added foam dots to the back of the white cardstock to give the whole layout more dimension! Ta-da it is completed!
The patterned papers and embellishments I used in this project are from Chickaniddy Crafts Twirly Girl collection.
 photo Supplies_zpse92adc3c.jpg
Supplies: Twirly Girly Patterned Papers – Itty Bitty Ballerina (TG14OS08), Grandma’s Quilt (TG14OS10), Keepsakes (TG14OS04), Party Dress (TG14OS06), Piggy Tails (TG14OS12), Rosy Posy (TG14OS01), Tea Party (TG14OS03), This and That (TG14OS07), Embellishments - Mini Sticker Tags (TG14EB04), Sticker Sheet (TG14EB02) 

 photo PicMonkeyCollage_zps065826fc.jpg

Thanks so much for dropping by and hope you have a great week ahead! I would also love to see your creations! Hashtag chickaniddycrafts on Instagram and I will be on the lookout! Till my next update, take care and God Bless!:D


Clique Kits Homecoming Pep Rally!


Warm welcome to the Clique Kits Homecoming Pep Rally!! You should have arrived from Danielle's blog! Fret not if you haven't! You can always start from Clique Kits blog! 

I am so excited to share with you my take on the November Mood Board playing with the Homecoming kit!! Have you bought/subscribe to kit? It's lovely and stocked with so many goodies! What's the best part? Participating and commenting in our blog share will win you a chance to get the awesome kit FREE!
Here's the mood board:
And my take on it:
 photo IMG_3753_zpse4945db4.jpg

 photo IMG_3754_zps1fc16579.jpg

 photo IMG_9680_zps342acf42.jpg
Just a tip to share on how to document your layouts if you think your handwriting ain't nice enough! My handwriting is too messy so I usually type on Microsoft and have them printed instead! To make sure that it fits exactly in the space you want it to fill, simple measure the space with your ruler then use Microsoft to limit the space as shown:
Then have it printed and stick your cardstock over it and run it through the printer again and ta-da, it should fit nicely!:D Hope this helps! 

Thanks so much for dropping by! Hop over to Alisha's blog for more inspiration! :D
 photo simply-sig_zpscc0a663a.jpg
 photo fb_zpsdef78796.jpg    photo insta_zps15a36000.jpg    photo pinterest_zpsa4f864e4.jpg    photo mail_zps2667dbe9.jpg