Image Map

You are my SUNSHINE!

Heyyie guys! For Timeless Twine and Scraplicious DT this month, I decided to do a cheery card!:) "You are my sunshine, my only sunshine, you make me happy, when skies are grey, you never know dear, how much I love you, please don't take my sunshine away!" AWWW was super inspired by this song to create a lovely card like this! Yay! Yellow makes me happy!

For all who may be feeling down, I hope that this card cheered you up as much as it cheered me up!
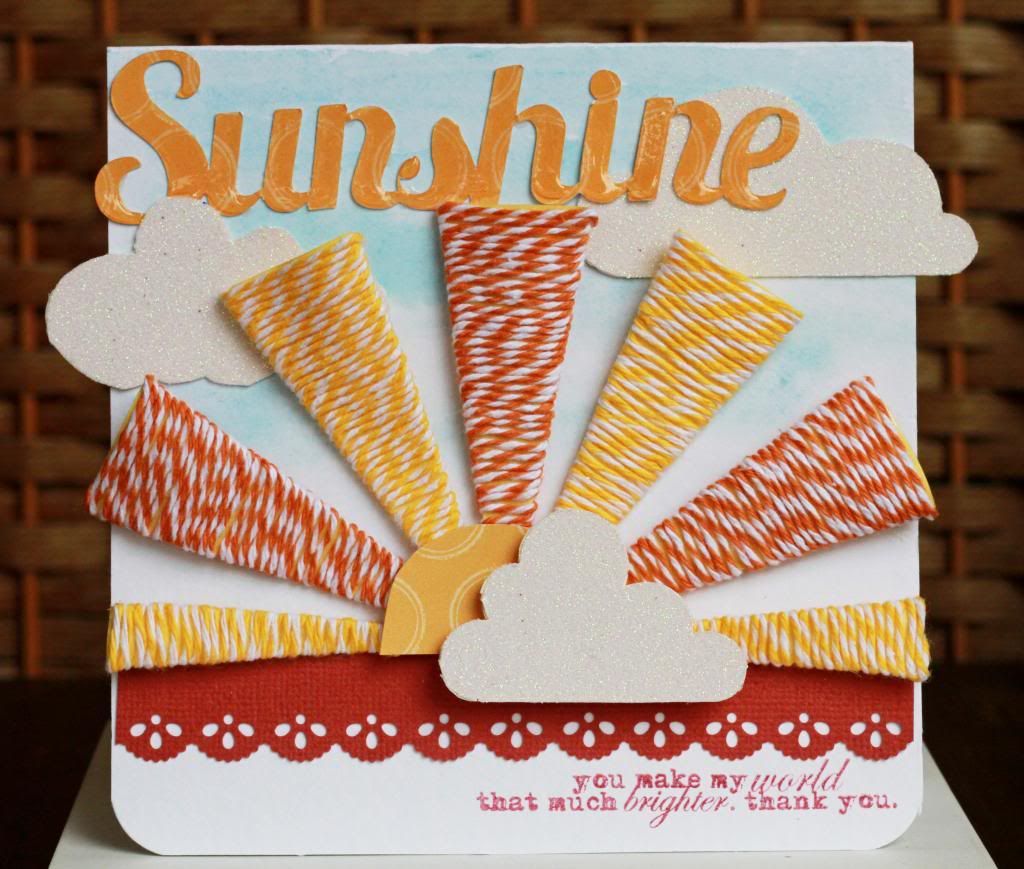

 photo IMG_7287_zpsf7882be6.jpg

 photo IMG_7293_zpscf1a7010.jpg

Supplies used:
-Cameo digital clouds 
-Timeless Twine - pumpkin orange and lemonade yellow
-Amy Tangerine Ready Set Go collection
-American Crafts cardstock - glittered white and red 
-Martha Stewart pinking scallop punch
-Technique Tuesday stamps
-Glossy accent

Most supplies are available at Scraplicious so head on down soon!:)And wanting to stock up on Timeless Twine? Head over to Bella Creationz

Have a great week ahead! Till my next update, take care and God Bless!:)
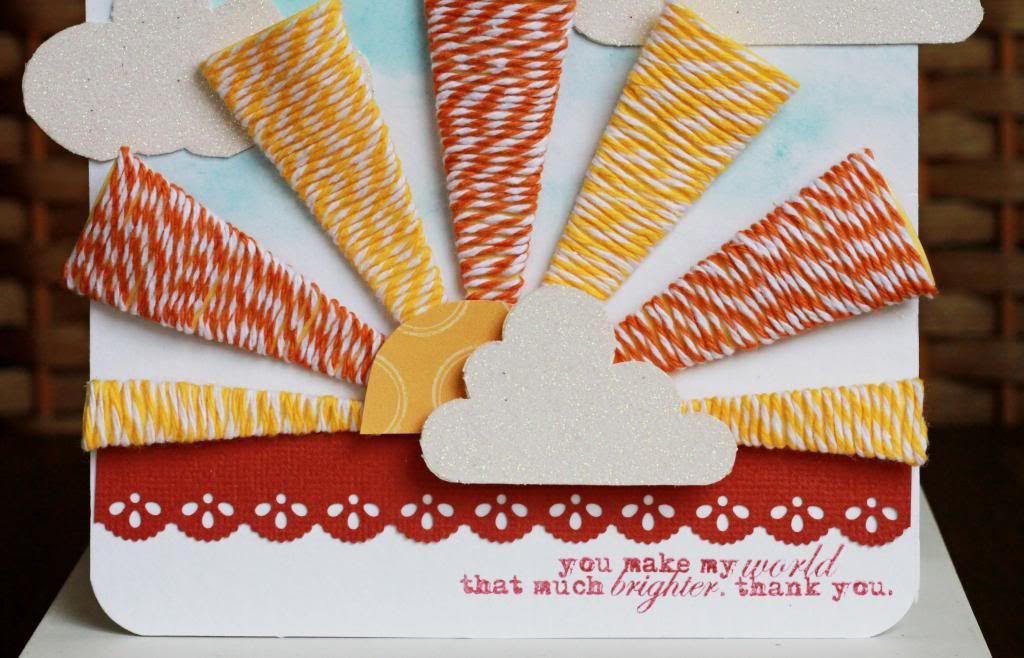
Timeless Twine New Release Blog Hop!

A very good morning to all! Welcome to my blog if this is your very first time! I am so excited to be participating in today's Timeless Twine New Release blog hop!

You should have arrived from Brianna's blog! If not, the hop begins at Timeless Twine blog! It will be a lot easier if you follow the order lest you get confused!

Oh, don't you love this new release colour!! I love the raw feel of it so much! And so, I wanted to try something new with this and decided to make a series of DIY accessories with them!:) I was so inspired by the many DIY accessories found on Pinterest! :O

 photo PicMonkeyCollage_zpse3fe8851.jpg


1. Earring: I added natural twine just to create more accent and color.

2. Bracelet: I first braid the twine and added Japanese-fabric buttons together with them! Then alternate it with string pearls.  Lastly, I secure them together with a short twine and added a hook to both side so they can be connected together.

3. Necklace: Last but not least, I use the twine to hold my small pretty jewellery bits!

Never thought of using twines in your jewellery making? Try it now!:D

I used the new release 
Natural Twine in all of my above accessories!


To the next stop who is the very talented Debbie!


BLOG GIVEAWAY ALERT!

INTERESTED TO WIN A SPOOL OF NATURAL TWINE? SIMPLY LEAVE A COMMENT AND BE A FOLLOWER OF EVERY DT MEMBERS' BLOG FOR A CHANCE TO WIN! ALL THE BEST! THERE WILL BE TWO WINNERS DRAWN!:D

Thanks all for popping by to say hi! Till my next update, have a twine-tastic day and God Bless!

XOXO

Happy Sweet Valentine's Day!!:D Just a quick post sharing an altered cork-board layout I did today!:)

 photo IMG_7376_zps37f894c5.jpg

 photo IMG_7385_zps8e09925c.jpg


 photo IMG_7389_zps29a64eff.jpg

 photo IMG_7390_zps719cf520.jpg

 photo IMG_7391_zps1c8e8a78.jpg

Scraplicious are in the midst of preparing them into kits so stay tuned! Besides all the yummy goodies thrown in, learn how to make a simple album from cardstock as well! Step by step instructions included!

Till my next update, take care and God Bless!:D

Valentine's Day LOVE!!

Heyyie guys! It has been awhile since my last post and hope you guys are doing great! A very short post today sharing some craft ideas I have done for my loved ones! Thanking the many online talents(The hands-on housewife and Creature Comforts) for sharing their lovely free printables!:) 

 photo IMG_7351_zps7dcf5031.jpg

 photo IMG_7357_zps0eccb9c6.jpg


 photo IMG_7364_zpsc08ea8a3.jpg

 photo IMG_7367_zpsbf7faa48.jpg


 photo IMG_7368_zpscd946c00.jpg

 photo IMG_7373_zps486eb4b0.jpg

Have you completed yours? Share them with me!:)

Till my next update, take care and God Bless!:)

You are my RAINBOW heart!

Heyyie guys! I am back today with more V-Day inspiration!:)For Timeless Twine and Scraplicious DT this month, I decided to create another love card!:)

It's exactly 6 days to Valentine's Day and have you completed your projects for your loved ones? :D Fret not if you haven't! I hope this card will give you more ideas on how to create a nice card for your loved ones!:)


 photo IMG_7276_zps6edd6484.jpg

 photo IMG_7280_zps5321319a.jpg

 photo IMG_7282_zps61dcbb4f.jpg

First, I drew a sketch of my rainbow on transparency and cut it out.

Then, I glued the twines using glossy accent as it dries clear!


Thirdly, I added foam dots at the front of the rainbow and glued it behind the heart so it gives the illusion that the rainbow is floating! Try this out!:)


Lastly, I added Crate Paper fourteen collection embellishments and added glossy accent to add accents to the card! Oh, not forgetting, I also painted the inside of the card pink with watercolour!

Supplies used:
-Crate Paper - Fourteen Collection - Cupid paper and die-cuts
-Timeless Twines - Cherry red, Pumpkin orange, bubble gum pink, lemonade yellow, olive green and aqua blue
-Cameo digital heart
-glossy accent
-Robin's Nest dew drops - rouge
-Technique Tuesdays acrylic stamp

Most supplies are available at Scraplicious so head on down soon!:)

Till my next update, take care and God Bless!:):)

Twined with Love

A very good morning to all! Welcome to my blog if this is your very first time! I am so excited to be participating in today's Timeless Twine Valentine's Day blog hop!

You should have arrived from Brianna's blog! If not, the hop begins at Timeless Twine blog! It will be a lot easier if you follow the order lest you get confused!

Are you in the midst of preparing something special for your loved ones? If you are in need of inspiration, I am sharing this post as well as a short tutorial on how I made this frame! Hope this helps!

Using the awesome, yummy, lovely, cutie Timeless strawberry cupcake twine, I made this altered frame!

 photo IMG_7222_zpsadefcf77.jpg

 photo IMG_7225_zps467efef5.jpg

Here's a simple tutorial:

 photo 20130127_191202_zps2fbcd500.jpg


Basically, I cut out the cardstock to fit the frame and used that as a backing. And I printed the words at the bottom using my trustworthy Canon printer! 

I have tried the Beacon glue to glue the starting few turns together but realised it's too sticky and the twine still fall off the wire easily. So, I decided to switch to glossy accent and it worked fine! So just add a little at the tip and it dries clear! So what I did to avoid dirtying my hand was to add the glue to both ends and leave it for awhile till it dries before I work on it.


 photo 20130127_192130_zps5482cc30.jpg

Then, I mould the word Love. It works either way. If the usage of twine is not of concern, then roll it on a straight wire and mould it later. That would be a lot easier. 

With that, I just add the cardstock and glue the word down with my glossy accent and ta-da! A very sweet Valentine's Day gift for your loved ones! Have you started making yours? Would love to see them!:)

To the next stop who is the very talented Debbie!


BLOG GIVEAWAY ALERT!


INTERESTED TO WIN A SPOOL OF STRAWBERRY CUPCAKE TWINE AND 1 PAD OF 6x6 CARTA BELLA "PARIS GIRL" PAPER PAD ? SIMPLY LEAVE A COMMENT AND BE A FOLLOWER OF EVERY DT MEMBERS' BLOG FOR A CHANCE TO WIN! ALL THE BEST!

Till my next update, have a twine-tastic day and God Bless!